You have been practicing Tai Chi for six months, and Repulse Monkey still feels like walking backward while waving your arms. Your torso leans back, your arms swing in big circles, your knees ache, and after practice your lower back hurts more than your legs. This guide breaks Repulse Monkey down into three parts — footwork, hand shapes, and weight shifting — so that after three weeks of practice, your backward steps can finally feel steady.
What Repulse Monkey Is Really Training
Repulse Monkey (Dao Juan Gong) is one of the few Tai Chi movements that travels backward. The name says it plainly: “juan gong” means the arms roll inward like a scroll being wound up, and “dao” means the steps move in reverse. But retreating is not fleeing. It is advancing by stepping back: the front hand dissolves the incoming force while the rear hand gathers power, and the whole body stretches like a bow being slowly drawn. In the Yang-style 24-form, it is done twice on each side, four sets in total, making it the most concentrated backward-stepping passage in the whole routine.
What this movement really trains is stability in retreat. Walking forward is easy, because your weight travels naturally with you. Walking backward, you cannot see where your foot will land, and the slightest shift in your center of gravity makes you wobble. Anyone who can walk Repulse Monkey steadily has already mastered the fundamentals — shifting between empty and full, turning the waist and hips. In the Yang-style 24-form, Repulse Monkey is done twice on each side, four sets in total, making it the most concentrated backward-stepping passage in the whole routine.
Footwork: How Many Steps, How Far, and Where the Weight Goes
The standard pattern is two steps back on each side, four steps in total, alternating left and right. Each step spans about one and a half to two foot-lengths, roughly 30 to 40 centimeters. Step too far and your hips split apart, leaving your weight stranded between your legs; step too short and the movement gets cramped, with no room to unfold.
Take the left side as an example. Stand with your right foot forward and your left foot back. First shift your weight onto your right leg — about 70 percent of it — and lift your left heel so only the toes touch the ground. Step your left foot back about 35 centimeters, toes touching down first, then the whole sole settling onto the floor. Once the foot is down, let your weight pour slowly backward until your left leg carries 70 percent and your right leg 30 percent; at that point your right heel lifts, ready for the next step. The whole process is like pouring water: your weight flows from one foot into the other without a single break. Beginners often mistake Repulse Monkey for “walking backward while waving your hands.” Its real core is a chain: the waist moves the hands, and the hands move the feet. Waist first, then hands, then the foot lands. Reverse that order and the whole movement falls apart.
Three details go wrong most often. First, do not let your toes turn outward more than 45 degrees when you step back. Toes splayed wide pull the knee inward, and after weeks of practice the front of the knee starts to ache. Second, do not land heel first and stomp down. A heel-first landing sends a shock through your knees and lower back; touching down with the toes first, then rolling onto the whole sole, makes the landing light and the weight easy to receive. Third, do not lean backward as you retreat. Leaning back means your weight has dropped onto your heels. The right feeling is a thread gently lifting the crown of your head upward, your chest slightly tucked in, your body upright and centered.
Here is a simple self-test. On flat ground, step back four times while keeping your eyes fixed on one point about three meters ahead. If you finish more than half a meter off your original straight line, your hips did not turn squarely.
Hand Shapes: What Each Hand Is Doing
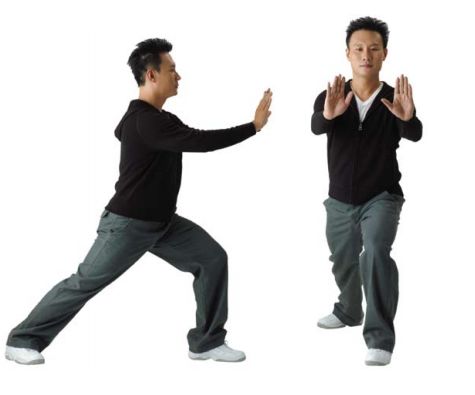
The hands work as a pair: one pushes, one presses; one opens, one closes. Take the step where your left foot goes back and your right hand is in front. Your right hand pushes forward at chest height, palm angled slightly forward and down, fingers naturally extended, as if you were gently pressing against a wall. Your left hand draws back to the inside of your right elbow, palm facing inward, in the “rolling” motion — as if you were cradling an invisible ball.
The push does not come from the arm. It comes from the waist turning: as your right hand pushes out, your waist turns about 30 degrees to the right, your right shoulder follows, and your arm extends to about 70 to 80 percent straight, keeping a slight bend in the elbow. When the hand reaches its farthest point, pause for half a second and feel the root of the palm grow slightly warm while the shoulder stays loose. That is a push done right. If your shoulder hikes up as you push, you are using arm strength alone and your waist is not involved.
The rolling hand matters just as much. Your left hand draws an arc from the inside of your right elbow toward the left side of your body, palm always facing inward. Do not spread your fingers into a claw, and do not clench them into a fist. As the hand draws back, the forearm rotates inward — imagine you are holding a cup of water in your palm that must not spill. That inward rotation is the true meaning of “juan gong,” the rolling of the forearm, and it is the part of the movement that stores power.
The rhythm is one step, one change of hands: left foot back, right hand pushes and left hand rolls; right foot back, the opposite. Hands and feet moving in sync is the test. If your foot has already landed while your hand is still halfway there, the timing is broken — slow down and line them up again. Beginners should practice at a slow pace of 4 to 6 steps per minute, and only speed up once hands and feet are moving together.
Breathing and Gaze: Two Things Beginners Overlook
The breathing rule is simple: inhale as you step back and draw the hands in, letting the breath sink to the lower abdomen; exhale as you push the hand out and settle into the stance. One breath cycle per step, four breaths per set. Never hold your breath — practicing a full set while holding your breath is a quick way to feel dizzy. Your eyes follow the pushing hand, resting about two meters ahead of it; do not look down at your feet, which tilts the body and breaks your upright posture.
Five Common Mistakes and How to Fix Them
Mistake 1: Leaning backward as you step back. You step back and wobble, as if you might fall over. The fix is wall practice: stand with your back about 10 centimeters from a wall and step backward. The moment you lean back, you touch the wall and notice it instantly. Once you can take ten steps in a row without touching the wall, you can leave the wall behind.
Mistake 2: Knees caving in while toes point outward. As the foot lands, the knee collapses inward while the toes point out, twisting the knee joint. The fix is to keep the toes and the knee pointing in the same direction: decide where the toes will point before the foot lands. You can also lay a straight line on the floor between your feet and make sure your toes never cross it as you step back.
Mistake 3: Arms swinging in big circles, shoulders stiff. The pushing arm sweeps a wide arc and the shoulders creep up toward the ears. The fix is empty-hand circle practice: with both hands in front of your chest, draw small circles about 30 centimeters across, shoulders dropped, elbows sinking. Only add footwork once the circles are round and relaxed. Keep the arm movement smaller rather than bigger.
Mistake 4: Shifting weight too fast, feet feeling floaty. You rush into the next step before the first one is stable, as if stepping on cotton. The fix is to pause for two seconds after each landing, confirming that your weight is firmly settled on the supporting leg before moving on. Slow is fast — get stable first, then talk about flow.
Mistake 5: Practicing only one side. Repulse Monkey must be trained on both sides. Do four sets on each side every session, plus one extra set on your weaker side.
A One-Week Practice Plan: From Pieces to Flow
Days 1–2: Practice the pieces separately. Standing still, practice the hand shapes alone — 20 pushes and 20 rolls — until you feel the waist driving the hands. Then practice the backward steps without hands, walking four steps back and forth 10 times.
Days 3–4: Combine hands and feet. At a slow pace of 4 steps per minute, do 4 sets on each side, 4 steps per set, resting one minute between sets. Focus on whether your hands and feet are in sync and whether each landing is light.
Days 5–7: Link it into the form. Place Repulse Monkey inside the 24-form: from Parting the Wild Horse’s Mane on both sides, through White Crane Spreads Its Wings and Brush Knee and Push, into Repulse Monkey, and walk the full sequence three times. Keep the total daily practice to 20 to 30 minutes.
Quick Answers
How far should each backward step be? About 30 to 40 centimeters, or one and a half to two foot-lengths. Longer steps split the hips and strand your weight; shorter steps cramp the movement.
Why does my lower back hurt after practicing? The most common cause is leaning backward as you retreat, which drops your weight onto your heels. Practice against a wall until you can step back ten times without touching it, and keep the crown of your head lifted.
Should the foot land heel first or toes first? Toes first, then roll onto the whole sole. A heel-first landing sends a shock into the knees and lower back; a toe-first landing is lighter and easier to receive.
How slow should I practice? At 4 to 6 steps per minute, with a two-second pause after each landing to confirm your weight is settled. Only speed up once your hands and feet move in sync.
Summary and Next Steps
Repulse Monkey trains stability in retreat and relaxation in the push. Remember three things: steps of 30 to 40 centimeters, toes touching down before the whole sole; the pushing arm about 70 to 80 percent extended with a slight elbow bend, driven by the waist turning; and a two-second pause after each landing to confirm your weight before the next step. Avoid the four traps — leaning back, knees caving in, swinging arms, and rushing steps — and the movement will naturally smooth out. You can start today: step back ten times against a wall, practice 20 pushes and rolls with empty hands, then put hands and feet together for four slow sets. After three weeks, most people reach the feeling of “retreating without wobbling, pushing without stiffening.”
Safety note: Go gradually and practice within your limits. If you have old knee or lower back injuries, slow down and shorten your steps, and stop immediately if you feel pain. If you have high blood pressure, heart disease, joint problems, or any other medical condition, consult a doctor before starting regular practice. This article is cultural and educational content for practice reference only, and it makes no promise of any health benefit.