Three months into your Tai Chi practice, you step into Single Whip and something still feels off. The shape looks right in the mirror — left hand hooked, right palm pushing forward, left leg bent — but the movement feels like pushing a door that will not quite close. It wobbles. It has no root. Here is the uncomfortable truth most beginners discover late: the problem is almost never in your hands. It is in the step your feet just took.
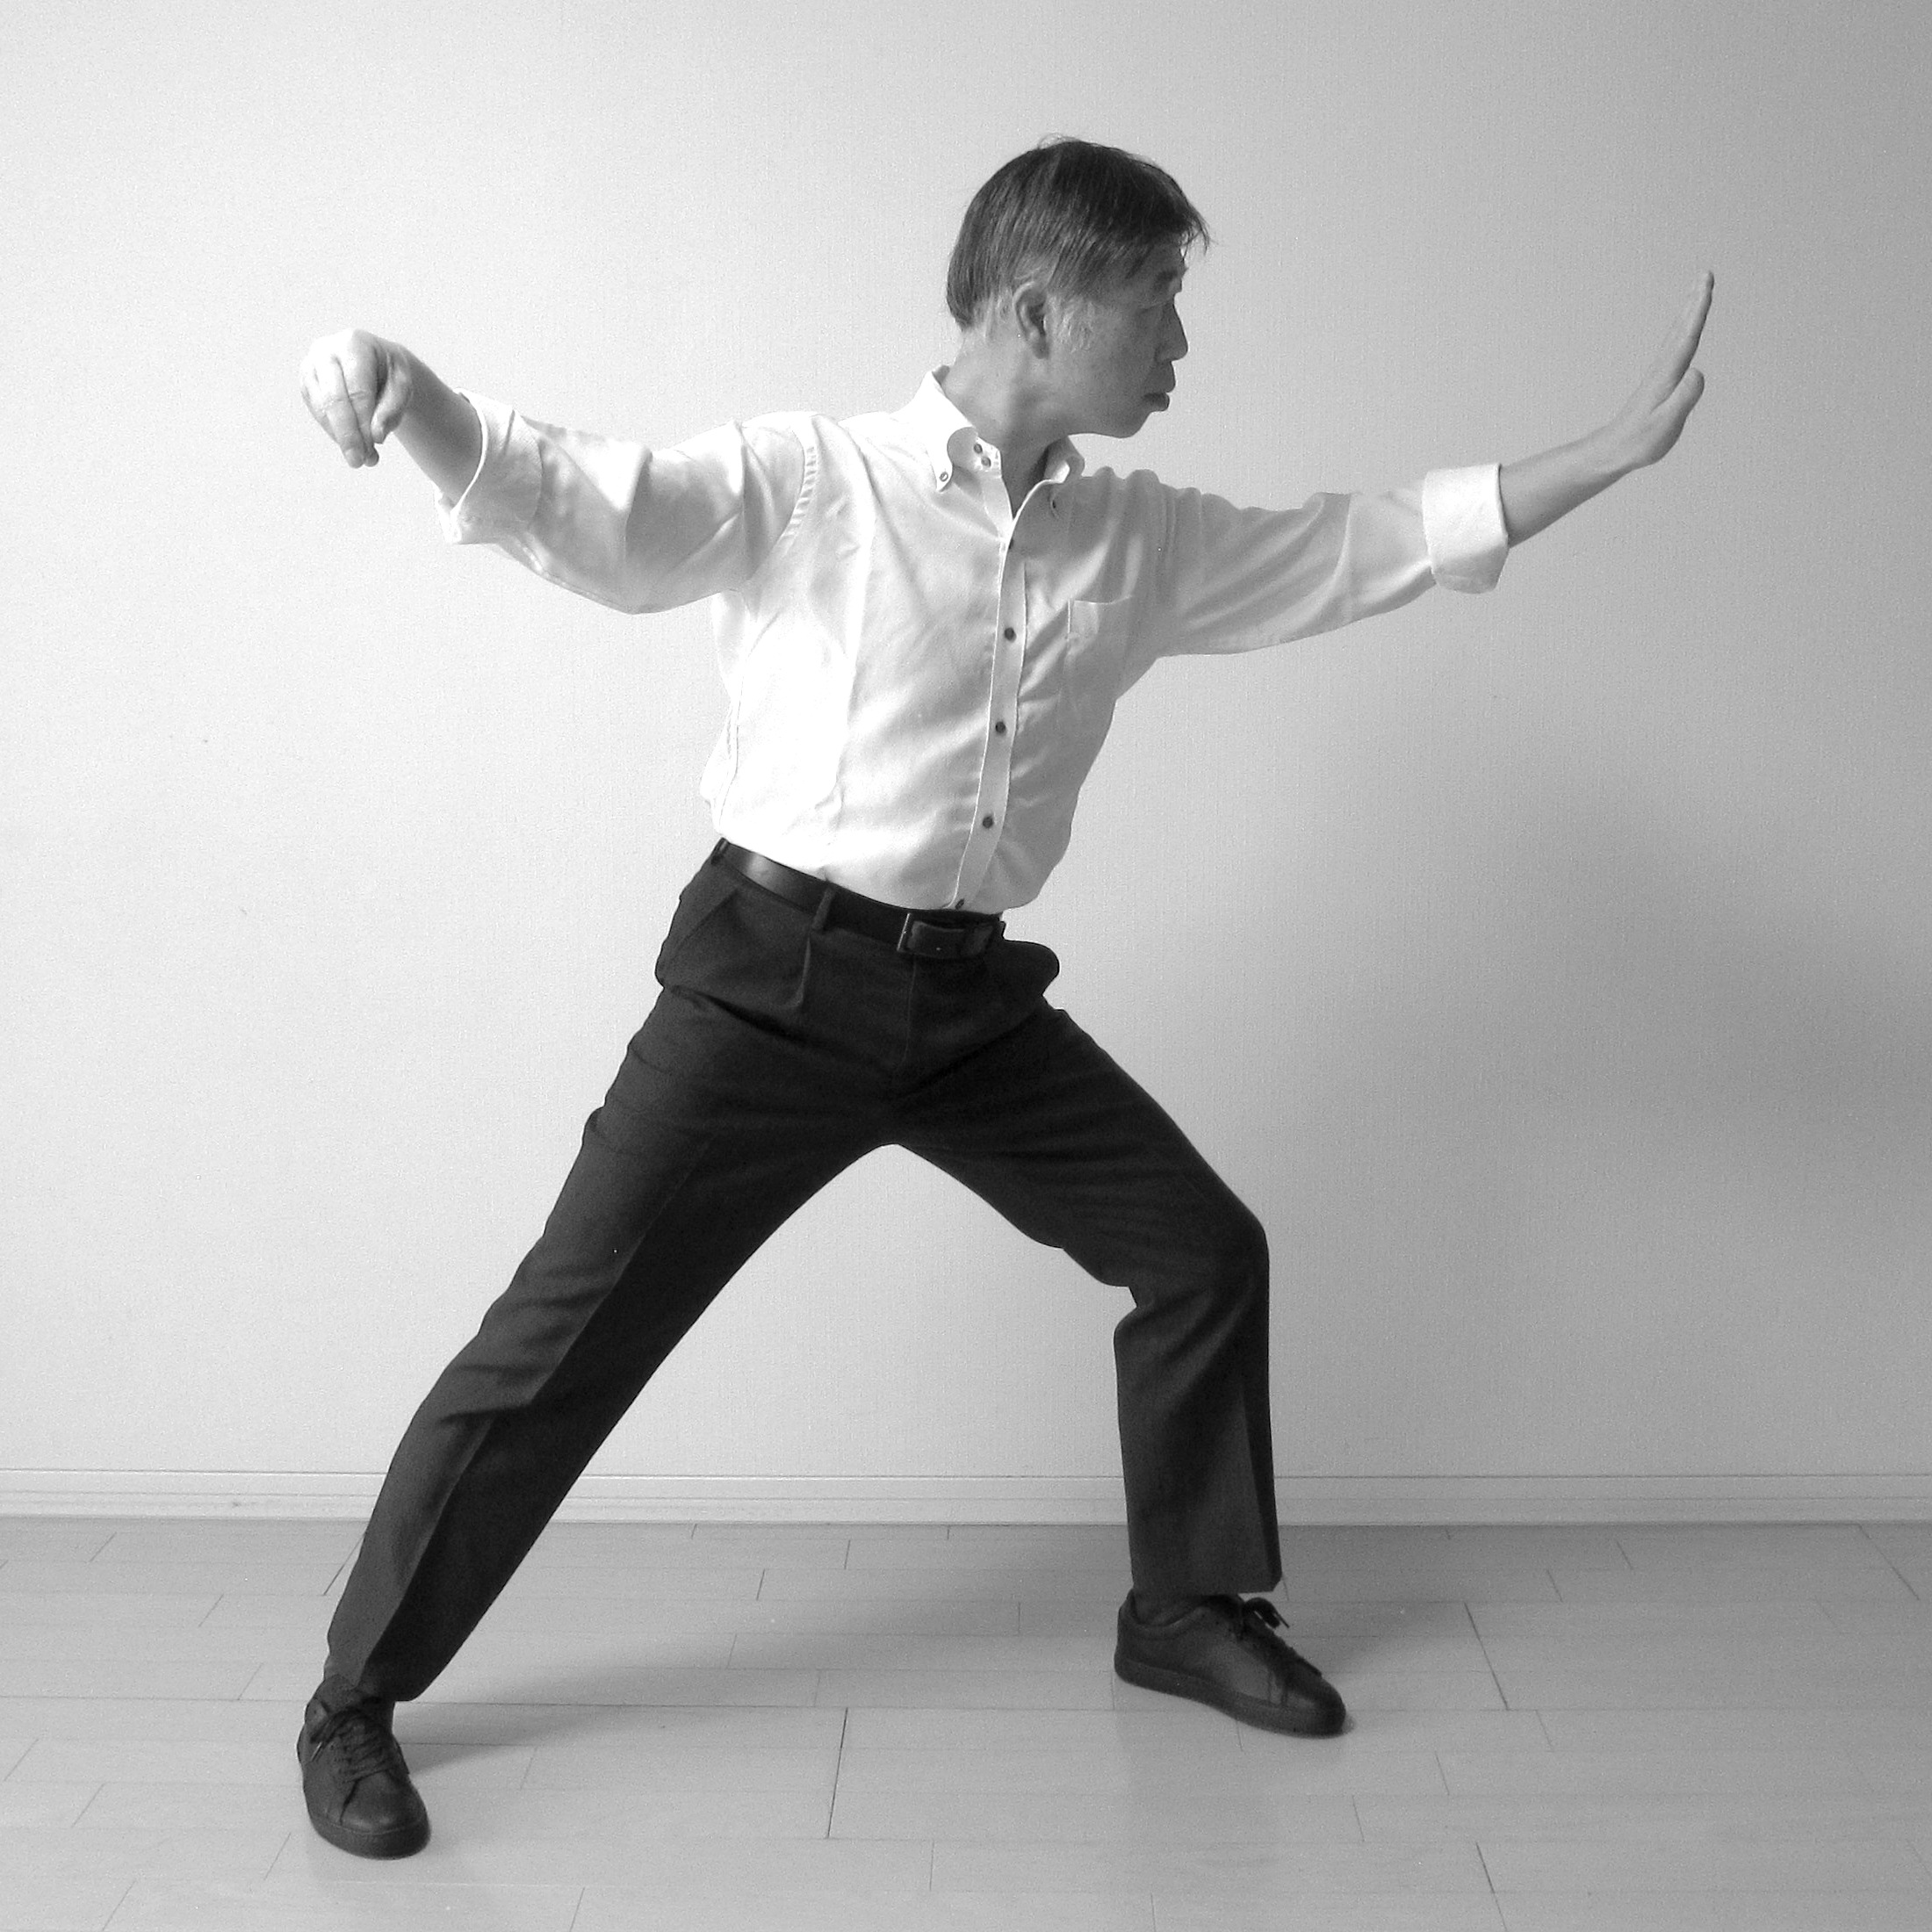
Single Whip, known in Chinese as Dan Bian, is one of the most recognizable postures in Tai Chi, a slow-moving Chinese martial art and health practice built around relaxed, continuous motion and whole-body coordination. It appears twice in the widely taught 24-form simplified routine. It looks simple enough to copy from a photo, which is exactly why so many people get it wrong. The posture is not a static pose to strike. It is a transition — a moment when your weight, your direction, and your power all change hands at once. Once you understand what is actually changing inside that single movement, the shape starts to make sense on its own.
Single Whip Is a Transition, Not a Pose
Single Whip never appears out of nowhere. In the 24-form routine, it always follows Grasp the Sparrow’s Tail, the sequence of ward-off, rollback, press, and push that is the backbone of the whole form. The link between the two movements is where the real lesson lives.
Coming out of Grasp the Sparrow’s Tail, your body first turns to the right. Your left foot steps out to the left and forward. Your right hand draws back to your waist, then rides the turn of your waist and pushes forward. Through the entire sequence, your hands are only the last link in the chain. The real power starts at the floor: the back foot pushes against the ground, the waist turns, the shoulder carries the palm forward. If the foot never pushes firmly, the waist turns in empty air. If the waist never turns, the arm is just an arm shoving at the air in front of you.
That is why teachers judge Single Whip by three tests, not by how it photographs. Can you stand in it without wobbling? Can the push actually travel forward through your body? And can you come back out of it cleanly into the next movement? Stand steady, send the power out, return under control — that is the standard. Everything in this guide serves those three tests.
Footwork: Get the Bow Stance Right and Half the Work Is Done
The footwork of Single Whip is a left bow stance. Your left foot steps forward, toes pointing ahead and turned very slightly inward, about 10 to 15 degrees. Your right foot stays behind, toes turned outward about 45 degrees, heel pressing into the ground. Side to side, your feet sit roughly one foot-width apart — about 20 to 30 centimeters. Front to back, the distance is about two and a half to three foot-lengths.
A person who is 1.7 meters tall does not step the same distance as someone who is 1.6 meters tall. What matters is what happens after you land: can your body sink down, with support in front and behind, without feeling like you are about to tip over? If the stance feels stable and springy, the distance is right for you.
The Front Leg: Bend It, But Guard the Knee
Your front leg bends into the bow. The knee points forward, tracking over the second toe, and it should not travel far past the toes. This is where beginners make their most intuitive mistake: they take a huge step because a wide stance feels powerful. The knee shoots past the toes, the ankle gets compressed and sore, and after thirty seconds the whole stance starts shaking. Step back ten centimeters, let the knee settle above the toes, and the stance firms up immediately.
There is a simple check you can do on the spot. Look down. You should still be able to see the toes of your front foot. If your knee completely hides them, you have stepped too far. Bring the step in until the toes reappear.
The Back Leg: Straight, But Never Locked
Your back leg pushes straight, but “straight” does not mean the knee is locked rigid. Think of the right leg as a diagonal line running from the heel up through the thigh. The heel stays on the ground, and the force travels upward from it. The moment the back heel lifts, you become a bridge leaning forward on one leg, and the palm push has to be muscled out by your upper body alone.
If your back heel keeps floating up, shorten the stance a little. A shorter stance with a grounded heel is worth far more than a long stance that leaves you floating.
Weight: Sixty-Forty, Front to Back
Your weight sits about 60 percent on the front leg and 40 percent on the back leg. You do not need a scale to find this. It should feel like sitting on the front edge of an invisible low stool: the front leg is solid, the back leg is bracing. If the inside of your front knee stings, or your ankle feels soft and wobbly, the angle is off. Shrink the stance first, then deepen it gradually as your legs get stronger.
Hand Shapes: The Hook Holds, the Palm Pushes
Single Whip uses two hand shapes at once: a hook with the left hand and a palm with the right. Getting the hands right is mostly about not overdoing either of them.
The hook is not a fist. Gather your five fingertips lightly together, point them downward, and let the wrist hang naturally, as if you were holding the handle of a small kettle by its loop. Squeeze too hard and the whole left arm stiffens, dragging the left shoulder up toward your ear. Hold it too loosely and the fingers splay open, and the hook loses its shape entirely. The right amount of tension is barely there: enough to keep the shape, loose enough that the wrist stays soft.
The right palm pushes forward with the fingers naturally apart, the palm facing forward at about shoulder height. The key detail is that the palm does not push from the wrist. Keep the arm relaxed and let the heel of the palm travel slightly forward. Many people collapse the wrist backward as they push, so the palm tilts upward and the force scatters. Fix it by watching the heel of the palm: when the push is fully extended, the heel of the palm, the shoulder, and the hip should sit roughly on one forward line. The fingers stay relaxed; the heel of the palm is solid.
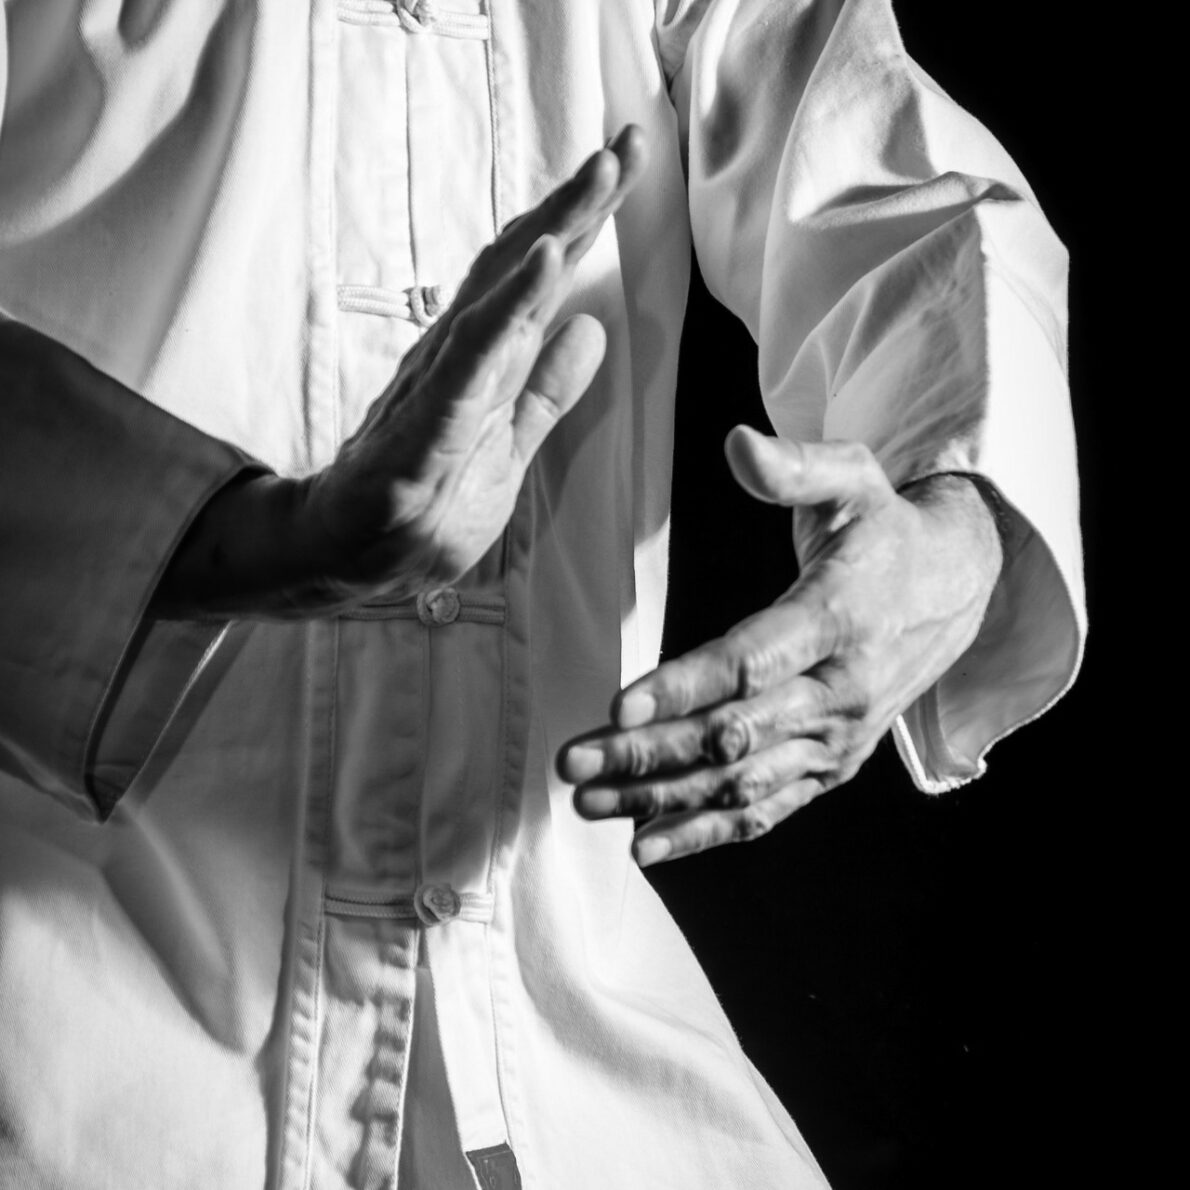
Between the two hands there is a quiet stretch in opposite directions. The hooked left hand anchors to the back-left while the right palm pushes forward, like drawing a bow. A bow only shoots when it is pulled open; if both hands rush in the same direction, the body cannot coil any power at all. Once you are settled in the posture, feel for that stretch: the left hand draws gently back, the right palm travels forward, the chest opens on its own, and the breathing eases. When you find that two-way pull, Single Whip starts to feel like it has somewhere to go.
Five Common Mistakes, Fixed One at a Time
After teaching dozens of students, the same five errors show up again and again. Fix only one at a time. Correct it fully, then move to the next. One fix at a time is much faster than trying to correct all five in a single session.
- 1. The front knee caves inward. The bow stance looks fine until the front knee collapses toward the inside, pointing at the inner side of the big toe. Over time the inside of the knee starts to ache. Fix it by aiming the knee at the second toe. Practice in front of a small mirror, or ask a training partner to check from the front: when the knee and the toes point the same way, you pass.
- 2. The upper body leans forward. As the palm pushes, the whole torso follows the hand, the hips stick out behind, and the body folds like a sheet of paper. Fix it by imagining a thread gently lifting the crown of your head while your tailbone sinks down. Keep your chest behind the vertical line of your front knee. Cut the reach of the palm push in half first — stand upright, then send the palm out farther only once the torso stays honest.
- 3. The hook hand squeezes too hard. The left hand clenches into a dead fist, the forearm goes stiff, and the shoulder creeps up to the ear. Fix it by shaking the left hand out completely before forming the hook, letting the wrist go fully soft, then gathering the fingertips lightly. Once settled, check the left shoulder: if it sits noticeably higher than usual, you are too tight. Relax and start over.
- 4. The push comes from the arm alone. The waist stays still while the arm reaches out. It looks like a long push, but there is no force behind it. Fix it by practicing the waist turn without the hands first. Put both hands on your hips, keep your feet still, and turn your waist 20 degrees to the left and back. Do that ten times until you can feel the waist leading the body. Then add the hands and let the palm follow the waist.
- 5. All the weight dumps onto the front leg. The back leg goes slack, the back heel lifts off the floor, and one push is enough to tip you forward. Fix it by settling into the Single Whip posture, then slowly shifting your weight backward until the back heel is planted firmly on the ground. Then send the weight forward again to the sixty-forty split. Repeat five times and your body will start remembering that the back leg has to hold its share.
Of these five, the caving front knee deserves to be fixed first. It is not only a question of how the posture looks — it directly affects the load on your knee joint. The other four can be worked on over the next two weeks, one or two per week. There is no rush to fix everything in a single day.
A Ten-Minute Daily Practice
Single Whip does not need an hour a day. Ten minutes, split into three short blocks, beats a two-hour weekend cram session every time.
Minutes 1 to 3: footwork only. Start from the closing position of Grasp the Sparrow’s Tail. Step left into the bow stance, step back, step out again — ten repetitions. Watch only your feet: knee tracking over the second toe, back heel on the ground, step distance comfortable. Once those three things are in place, stop.
Minutes 4 to 6: hold the posture. Settle into the full Single Whip position and hold it, breathing naturally, for about thirty slow breaths. While you hold, check three things: the front knee points at the second toe, the back heel is planted, and the left shoulder is relaxed. Whichever spot gets sore first is the spot compensating for the others. Adjust it and continue. If your legs ache after one minute at first, that is completely normal. After a week of daily practice, three minutes will feel much easier.
Minutes 7 to 10: the full link. Move from Grasp the Sparrow’s Tail all the way into Single Whip, five times in a row, pausing three seconds between repetitions to check the posture. The first repetition is about steadiness. By the third, start feeling the waist carry the palm. On the fifth, make sure you are not holding your breath. When the five are done, walk in place for a minute to loosen up, then close.
One thing to focus on today: a good Single Whip is not measured by how beautiful it looks. It is measured by whether you can stand in it, send the power out, and come back under control. The footwork gives it roots, the hand shapes give it form, and the waist gives it force. Of the three, the footwork is the first thing to fix — and the easiest to overlook.
So in today’s practice, watch just one thing: the direction of your front knee. Knee over the second toe, back heel on the ground, and let the waist turn before the palm pushes. Practice ten minutes a day for seven days, then look at your Single Whip again. Your stance and your power will both feel different. Tai Chi does not punish slowness. What it punishes is practicing the wrong thing until it becomes a habit.
Quick Answers
Why does my knee hurt in Single Whip? The most common cause is the front knee caving inward or shooting past the toes. Shorten the step, aim the knee over the second toe, and check that you can still see your front toes. If pain persists, stop and rest, and get professional advice before continuing.
How wide should my stance be? About 20 to 30 centimeters across and two and a half to three foot-lengths front to back, adjusted to your height. The real test is stability: can you sink down, stay steady, and push without wobbling?
Should the hook hand be tight or loose? Lightly gathered, never clenched. Think of holding a kettle handle by its loop: enough shape to hold, loose enough that the wrist and shoulder stay soft.
Where does the power come from? From the ground up. The back foot pushes, the waist turns, the shoulder carries the palm. If the waist does not turn, the arm is pushing on its own and the movement has no force behind it.
How long should I practice each day? Ten minutes is enough: three minutes of footwork, three minutes holding the posture, four minutes linking the full movement. Consistency matters more than duration — daily short practice beats occasional long sessions.
Is Single Whip suitable for beginners? Yes, and it is one of the best postures for learning how the whole body works together. Start with a small stance, keep the movements gentle, and deepen the posture gradually as your legs and balance improve.
Practice gradually and listen to your body. Build up the depth of your stance and the length of your sessions slowly, and stop immediately if your knees, lower back, or joints hurt. If you have joint problems, back issues, or cardiovascular conditions, consult a doctor before starting a regular practice, and adjust the intensity to your own situation. This article is a cultural introduction to a traditional practice; it makes no promise of any health outcome.