Picture a quiet morning in the park. A Tai Chi group moves through its form in unison, slow and unhurried, until one practitioner reaches a move that looks simple but feels anything but: one hand pushes forward, the other stays close to the chest, and the whole body shifts its weight from one leg to the other. It is called High Pat on Horse, and it is the move where most beginners get stuck. The pushing hand feels like it is shoving against a wall. The feet wobble the moment they move. And afterward, the knees ache.
The problem is almost never a lack of strength. It is a mismatch between the footwork and the hand shape, and between the hands and the breath. Break this single posture apart and there are really only three things to get right: how the feet walk, how the hands push, and how the breath follows. Get those three right, and High Pat on Horse stops feeling like a struggle and starts feeling like what it is supposed to be: a smooth transfer of weight with a relaxed, rooted push.
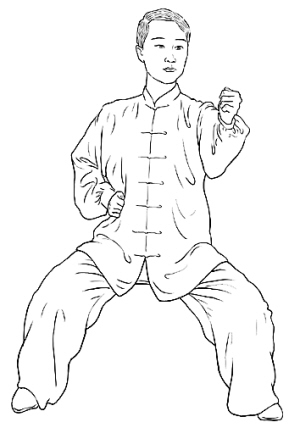
What Is High Pat on Horse, and What Does It Train?
High Pat on Horse is a transitional and issuing movement in Tai Chi. The Chinese name says it well: the front hand reaches out and up, as if feeling its way forward along a path, while the back hand stays near the chest to guard the centerline. The body completes one full weight transfer between a bow stance and an empty stance. In most forms it appears right after Grasp the Sparrow’s Tail and leads into White Crane Spreads Its Wings or Brush Knee and Push, which makes it a hinge point in the sequence: what came before flows into it, and what comes after flows out of it.
Beginners usually treat it as a simple palm push. They focus on extending the arm forward, the shoulders creep up toward the ears, and the waist stops turning altogether. But the push is only the visible part. High Pat on Horse really trains three kinds of coordination. First, the weight moves before the hand does: the feet and legs lead, the palm arrives second. Second, the waist and hips drive the arm; the arm does not generate the force by itself. Third, the eyes follow the pushing palm, and the crown of the head feels as if a thread is gently lifting it upward. Keep those three ideas in mind, and the movement suddenly has a spine to hang on.
You do not need many repetitions to learn it. Once you can stand steadily, practice 8 to 10 repetitions in a row, then stop and check the position of your feet and hands before continuing. Quality beats quantity here, every time.
Footwork: Weight First, Heel Lands First
The heart of the footwork is a clear distinction between the solid leg and the empty leg, what Tai Chi calls distinguishing full and empty. Take the front foot as an example. The ball of the foot touches the ground lightly first, then the heel settles down slowly, and through the whole process the weight stays on the back leg. Only when the front foot is firmly planted does the weight begin to move forward. Many beginners load all their weight onto the front foot the moment it moves, so the body lunges before the foot is stable, the knee shoots past the toes, and the knees ache afterward. That ache is a footwork problem, not a knee problem.
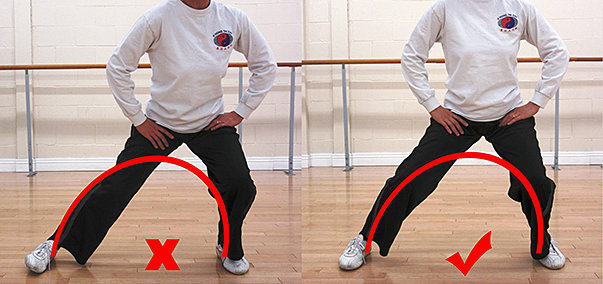
You can measure the stance with your own body. The front-to-back distance between the two feet is about one and a half to two foot-lengths; the side-to-side width is roughly one shoulder-width. The front toes point forward and slightly outward, about 15 degrees, while the back toes turn out around 45 degrees. Together the two feet form a stable triangular base. As the bow stance takes shape, the front knee bends in the direction of the toes and stays behind the toe line, while the back leg presses straight without locking the knee, leaving a small amount of bend in reserve.
There is a simple rhythm for the weight transfer: lift light, land steady, shift slow. When the foot lifts, let the toes skim the ground, rising only 3 to 5 centimeters. When it lands, heel first, then the ball of the foot, as if stepping onto thin ice: light and steady. Let the weight transfer take about 3 seconds, counting one, two, three before you arrive. Too fast and you wobble; too slow and you stiffen up. A useful drill is to lay a strip of tape on the floor as a reference line. After 10 repetitions, your feet should be landing on nearly the same line every time. When they do, your footwork has started to settle in.
Hand Shapes: Front Palm, Back Guard, and the Waist That Connects Them
The two hands have different jobs. The front hand is the pushing palm: the palm faces forward and slightly upward, the five fingers open naturally with the fingertips lifted a little, and the heel of the palm leads the push forward. The palm sits at shoulder height or just above it, and the elbow stays slightly bent, never straightened and locked. The pushing force comes from the heel of the palm, not from the fingers. The fingers simply go along for the ride; spreading them too hard only stiffens the wrist.
The back hand stays in front of the chest, palm facing down or inward, guarding the chest and ribs at roughly one fist’s distance from the body. Many beginners let this hand drift down to the waist without noticing, or forget it exists entirely. But the two hands are a pair: the front hand explores the way forward, and the back hand guards the gate. Only when both are in place is the movement complete.
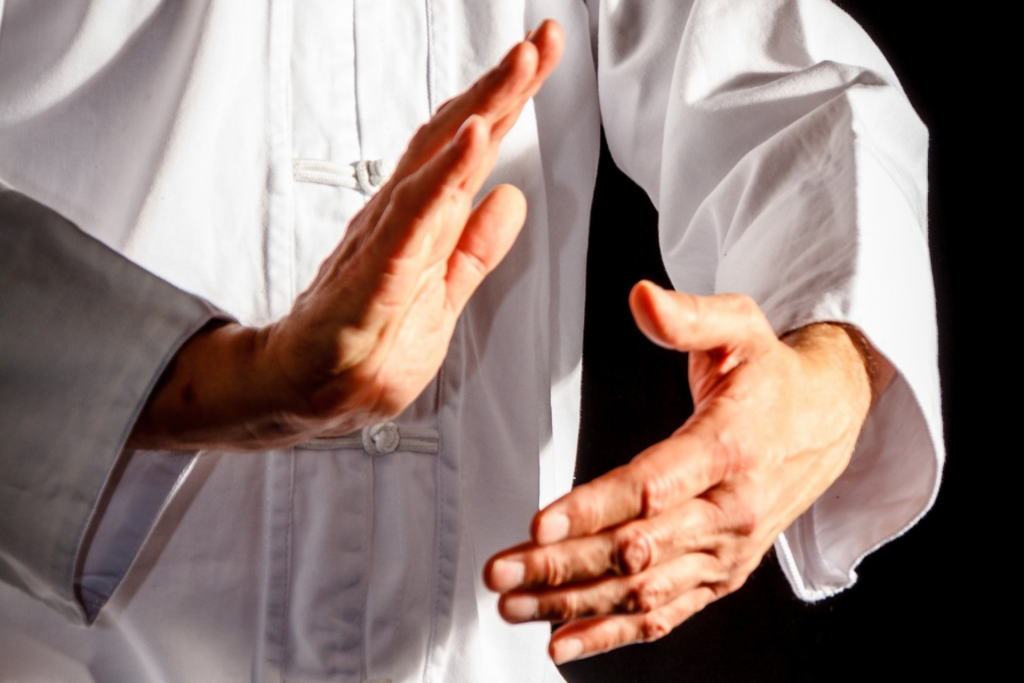
The connection between the hands and the waist is the part most often overlooked. As the palm pushes, the waist turns toward the pushing direction by about 15 to 20 degrees first, and the hand follows the waist. If only the arm moves and the waist stays still, the push looks right but feels hollow: it has shape but no root. Try this: rest one hand lightly on your waist and feel whether the waist turns a little before the palm moves. After 5 repetitions, that feeling starts to come back.
Watch the height of the arms as well. The front palm stops at shoulder level. Push too high and the shoulders rise; push too low and it looks like you are shoving a table. Practicing in front of a mirror makes this obvious at a glance: when the push is complete, the shoulders are sunk down, the neck is relaxed, the chin is tucked slightly inward, and the gaze travels past the palm toward the distance. From shoulder to fingertip, the whole arm forms one relaxed, extended line.
Breathing: In on the Gather, Out on the Push
The breathing for High Pat on Horse is straightforward: inhale as you gather, exhale as you push. As both hands draw back and the weight settles onto the rear leg, breathe in slowly and let the breath sink toward the lower abdomen. As the front palm pushes out and the weight moves forward, breathe out gently and evenly, without dumping all the air at once. One full breath takes about 4 to 6 seconds, matching the rhythm of the movement: if the movement is fast, the breath is fast; if the movement slows, the breath slows with it.
The most common beginner mistake is holding the breath. The moment the push requires effort, the breath locks, and after one repetition the face is flushed red. The fix is to let a little sound out: as the palm pushes, make a soft “hoo” exhale, just loud enough for you to hear it yourself. With the sound as a reference, you will notice the breath-holding immediately. After 3 repetitions, the breath and the movement usually start to fall into step.
Five Common Mistakes and How to Fix Them
Mistake 1: The Knee Collapses Inward
After the bow stance forms, the front knee caves toward the middle, and over time the inside of the knee starts to hurt. The fix is to keep the knee tracking over the second and third toes, with the toes and the knee pointing in the same direction. A small piece of tape on the outside of the knee works as a reminder. After 10 repetitions, the inward collapse usually improves noticeably.
Mistake 2: The Weight Lunges Forward
The foot has not landed yet, but the weight has already rushed onto the front leg, the body leans forward by more than 10 degrees, and afterward the lower back and legs feel sore and weak. Slow the weight transfer down to a full 3 seconds and count the beats: land the foot, pause for 1 second, then shift the weight. You can also hold a park railing for 5 repetitions to recover the feeling of a stable landing before practicing hands-free.
Mistake 3: Shoulders Rise and the Chin Juts Out
As the palm pushes, the shoulders climb toward the ears, the chin sticks forward, and the whole neck tightens. Before pushing, sink the shoulders: let them drop about 1 centimeter, as if you were balancing two cups of water on them that must not spill, and keep that feeling through the push.
Mistake 4: Hands and Feet Fall Out of Sync
The hand goes out first while the foot is still in place, or the foot arrives while the hand lags behind, and the movement breaks into two disconnected halves. Slow the whole posture down to 8 seconds per repetition: 3 seconds to shift the weight, 3 seconds to push the palm, and 2 seconds held still to check your position. After 5 slow repetitions, the order of hands and feet becomes clear, and you can gradually return to normal speed.
Mistake 5: The Back Hand Disappears
The back hand drops to the waist or swings behind the body, leaving only the front hand working. The fix is to check the back hand first every time you gather: palm facing down, guarding the chest, one fist away from the body. Build the habit of “check the back hand first, then push the front hand,” and after about 20 repetitions, the back hand stops disappearing.
Putting It All Together: The Five-Point Check
When High Pat on Horse is done well, the standard is refreshingly plain: the feet land steadily, the weight shifts slowly, the palm pushes smoothly, and the breath never stops. Once you are standing steadily, hold the posture for 3 seconds and run through five checks: the front knee points along the toes, the back leg presses straight without locking, the shoulders are sunk, the back hand guards the chest, and the gaze travels past the palm. When all five check out, the posture is standing on its own.
A simple practice plan works well: one set in the morning and one in the evening, 8 to 10 repetitions per set, alternating sides each time, followed by 2 minutes of slow walking to relax. After two weeks, do the whole sequence at half speed once and see whether any wobble or breath-holding shows up in slow motion. Once the single posture feels stable, put it back into the full Tai Chi form, right after Grasp the Sparrow’s Tail, and walk through it three times. When the transitions feel natural, High Pat on Horse has truly settled into your body.
Quick Answers
Why do my knees ache after practicing? The usual cause is footwork: the weight rushes onto the front foot before it is planted, and the knee passes the toes. Land the foot first, pause for 1 second, then shift the weight over 3 seconds, and keep the knee tracking over the toes.
How high should the pushing palm go? Shoulder height, or just above it. Higher than that and the shoulders rise; lower and the push loses its shape. Check in a mirror: shoulders down, neck relaxed, chin slightly tucked.
What does the back hand actually do? It guards the chest and ribs, about one fist away from the body, palm down or inward. Think of it as the gatekeeper: the front hand explores, the back hand guards. A posture with only one hand working is only half a posture.
How long until the coordination clicks? Most people feel the footwork settle within a week of daily practice, and the waist-hand connection within two to three weeks. The 8-second slow version is the fastest teacher: 5 slow repetitions reveal the order of hands and feet better than 50 fast ones.
Can I practice this move on its own? Yes, that is the best way to learn it. Practice it as a single posture for two weeks, then place it back into the full form after Grasp the Sparrow’s Tail. A posture learned in isolation transfers into the form much more cleanly than one learned only inside the flow.
Practice safely: Progress gradually and work within your own limits. Do not chase large, dramatic movements in a single step. If you have a history of knee problems, poor balance, or any other health concern, consult a doctor before starting, and adjust the intensity and range of your practice to suit your own condition. If you feel pain, dizziness, or clear discomfort during practice, stop immediately and rest. Tai Chi is a long-term body practice that rewards consistency and moderation, not intensity, and it makes no promise to treat or cure any condition.