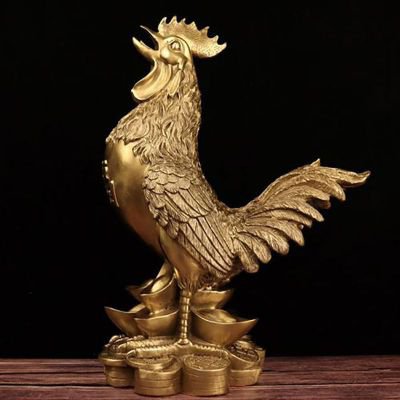
It’s 6:30 in the morning, and the Tai Chi group in the park has just reached Golden Rooster Stands on One Leg. A woman in her sixties lifts her left leg — and wobbles. Her right foot shuffles half a step sideways before she steadies herself. The instructor doesn’t scold her. He just says: “It’s not that your leg is weak. Your weight is still on your left foot.” That one sentence names the problem most people have with this move. Golden Rooster looks like nothing more than lifting one leg, but what it really trains is three things at once: shifting your weight, coordinating hands and feet, and breathing. Miss any one of them, and the whole posture falls apart.
In Yang-style Tai Chi — the most widely practiced Tai Chi style in the world, known for its slow, expansive, even-paced movements — Golden Rooster usually follows a move called “High Pat on Horse” (Gao Tan Ma), and it is done once on each side. If you’ve ever watched a Tai Chi group in a park and wondered how the older practitioners stand so still on one leg, this is the move that builds that steadiness. And the good news is that it transfers directly to daily life: climbing stairs, putting on shoes while standing, walking on uneven ground — all of it depends on single-leg support.
What Golden Rooster Actually Trains
The whole movement breaks down into three phases: shift your weight onto one leg, lift the opposite knee, then let the hands rise and fall into the final pose. Most people skip straight to lifting the leg, and their supporting knee buckles before they’ve even started. The correct order is weight first, knee second. Once your weight has fully arrived on the supporting leg, lifting the knee becomes almost effortless.
Golden Rooster is also a balance test you can run on yourself. If you can stand still for 10 seconds without your supporting foot shuffling or your arms flailing, your weight shift is working. If you can’t yet, the rest of this guide will show you exactly which piece to fix.
Footwork: Move the Weight First, Then Lift the Knee
Coming out of High Pat on Horse, your right foot is the supporting foot. Slowly press your weight down into the right leg until you feel the sole of your right foot grounded at three points: the base of the big toe, the base of the little toe, and the heel. All three press into the ground at once, like the three legs of a tripod. Your left foot, meanwhile, is only touching the ground lightly with the toes — empty, ready to leave the floor at any moment.
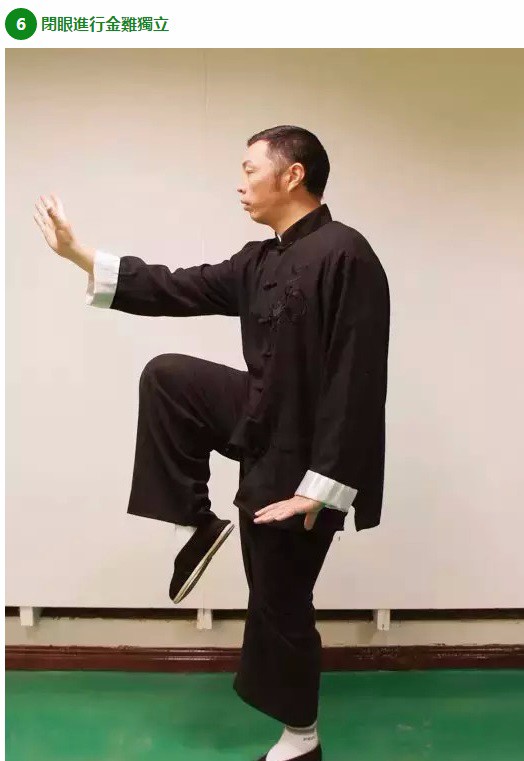
When you lift the left knee, raise it straight forward until the thigh is close to horizontal. There is no need to lift higher; chasing height is how people lose their balance. Keep the knee pointing in the same direction as the toes — a knee that collapses inward or flares outward pulls your weight off-center. Keep the hips square to the front and resist the urge to twist your waist to get the leg higher.
As the knee rises, the supporting knee stays slightly bent. Never lock it straight. A softly bent knee works like a spring, absorbing the small sways that would otherwise topple you.
Putting the foot down matters just as much as lifting it. After holding the pose for a few seconds, lower the left foot toe-first, then roll onto the whole sole. Never drop the whole foot down with a thud. The quieter your landing, the better your weight control. When you switch sides, repeat the same sequence: weight onto the left leg first, then lift the right knee. Do three reps per side to make one set.
- Supporting foot: three points on the ground, knee softly bent, toes and knee pointing the same way.
- Knee height: thigh close to horizontal is enough; work within your own range, never force it.
- Putting the foot down: toes touch first, lower gently, no stomping.
Hand Shapes: One Hand Up, One Hand Down, Both With Intent
The hands are the part of Golden Rooster most people ignore, and it shows. The right hand rises, the left hand presses down, and the two pull gently against each other. The right palm stands upright in front of the chest, slightly to the right, palm facing left, fingers naturally extended — as if a wall stood in front of you and the heel of your palm were lightly pressing against it. The left palm presses down above the left knee, palm facing down, fingers pointing forward, as if you were holding a balloon down — there is a little energy in the palm, never limp and dangling.
Hands and legs must move together. As the left knee lifts, the right hand threads upward and the left hand presses down at the same moment. If the hands are half a beat early or half a beat late, the whole posture looks disconnected. While practicing, count silently: “one” — lift the knee and open the palms; “two” — hold still. The rhythm ties the hands and feet together.
In the final pose, your gaze rests toward the right hand. Fix your eyes on one point — a steady gaze steadies the body. Staring at the floor or glancing around makes balance noticeably worse.
Keep the wrists straight. The energy comes from the heel of the palm while the fingers stay relaxed, and the wrist stays in a straight line with the forearm. Many beginners bend the wrist back to almost 90 degrees when they open the palm, and their wrists ache after a few minutes. Quick check: after you open the palm, the back of your hand and your forearm should form roughly one straight line.
Breathing and Gaze: Inhale to Lift, Exhale to Settle
Breathing is the invisible support structure of this move. Inhale as you lift the knee, letting the breath settle low in the abdomen — in traditional Chinese practice this lower-abdomen center is called the dantian, roughly the area a few inches below the navel, treated as the body’s center of gravity and breath. As you settle into the pose, exhale slowly and let the shoulders drop. Never shrug.
Holding your breath while balancing is the most common mistake of all. The moment you hold your breath, your chest tightens and your body sways more, not less. If you catch yourself holding your breath, shorten the hold to three seconds first. Get the breathing smooth, then build the time back up.
Five Common Mistakes, Fixed One by One
Eight out of ten people trip over the same few faults when they learn Golden Rooster. Fix them one at a time — correcting one fault beats ten sloppy repetitions.
Mistake 1: Lifting the Leg Too Fast, Weight Left Behind
The leg is up, but the body is still tipping to the left. Fix: before you lift, count silently to one and confirm your weight has fully arrived on the supporting leg — the other foot should already feel empty. Slower is better than wobbly.
Mistake 2: The Supporting Knee Collapses Inward
The knee caves in, the ankle rolls with it, and the stance becomes both unstable and hard on the knee. Fix: as you lift, imagine the knee tracking toward the second toe, and press the outer edge of the foot slightly into the ground. If your knee always collapses inward, practice single-leg standing against a wall first, using it to find the feeling of knee-over-toes.
Mistake 3: Leaning Back or Hunching Forward
Some people lean back to “reach” the hand shape; others hunch forward because they’re afraid of falling. Fix: imagine a thread pulling the crown of your head upward, and tuck the tailbone slightly in so the body stays upright and centered. Ask a practice partner to look at you from the side: ear, shoulder, and hip should sit on one vertical line.
Mistake 4: Weak Hands, the Open Palm Like a Prop
The hands go up, but the palms have no energy, and the whole posture looks loose. Fix: as you open the palm, imagine a sheet of paper in front of it and press gently with the heel of the palm so it doesn’t fall. Once the palm has “something” in it, the hands come alive.
Mistake 5: Greedy Hold Times That Distort the Posture
You’ve just learned the move and already want to hold it for 30 seconds — by 10 seconds the knee is trembling and the hands have collapsed. Fix: start with 5 seconds. Five steady seconds beat twenty wobbly ones. Add 2 to 3 seconds per week and build up gradually.
A One-Week Practice Plan: From Wall Support to Hands-Free
Days 1–2: hold the wall. Right hand on the wall, lift the left knee, hold for 5 seconds, five times per side. The goal is simply to feel your weight land on the supporting leg.
Days 3–4: fingertips only. Touch the wall with just your fingertips, and extend the hold to 8 seconds.
Day 5: try hands-free. If you start to wobble, touch the wall immediately — never tough it out. Safety first, pride second.
Days 6–7: hands-free for 10 seconds, five times per side, then finish with three minutes of slow walking to relax.
One warning sign to watch for: if the sole of your supporting foot starts to sting, or your ankle keeps twisting, stop and check your shoes. Soles that are too soft or heels that are too high both undermine single-leg standing.
Quick Answers
How long should I hold the pose? Start at 5 seconds and add 2 to 3 seconds a week. A steady 10-second hold is a solid goal for the first month — and a genuine test of your balance.
How high should the knee go? Thigh close to horizontal is enough. Height is not the point; a stable weight shift is.
Which side should I practice first? Start with whichever side feels weaker — most people have one side that wobbles more. Train the weak side first while you’re fresh, then match it on the other side.
Can I practice every day? Yes. Five minutes a day, three reps per side, is plenty. Daily short practice beats one long weekly session.
Do I need a teacher? A teacher helps enormously with the details — especially knee alignment and hand shapes. But the wall-supported version in this guide is safe to start on your own, and a few group classes can correct what self-practice can’t see.
Why do my arms feel tired before my legs? Because the hands are doing real work: the two palms pull against each other, and holding that gentle tension takes endurance. It improves quickly with practice.
Three Lines to Remember
The whole move condenses into three lines: weight arrives first, knee rises second; the two hands pull apart, both palms full of intent; breathing stays smooth, gaze stays fixed. Tape these three lines where you practice and read them before each session — the moment your form starts to drift, they will tell you exactly where to look.
Start today. Five minutes is enough: wall or no wall, three reps per side, five seconds per hold. In two weeks, try standing hands-free for 10 seconds.
Safety note: practice gradually and within your own limits. If you have old knee or ankle injuries, or poor balance, practice with wall support first or consult a qualified instructor. Stop immediately and seek medical advice if you feel dizzy, short of breath, or experience joint pain during practice. This article is cultural education only and makes no promise of health benefits.